Wednesday, September 30, 2015

Kenleyisms

Kenley is a month away from being three years old {how?} and she won't.stop.talking. To be honest, I completely lost track of what was "typical" in terms of milestones and development after she turned one, but it seems to me this kid's vocabulary and language is a little ahead of it's time. She doesn't miss a thing, remembers EVERYTHING and is quite literally an adorable little sponge.
While she is speaking in full sentences, uses words like "actually", "remember" and "probably"{correctly I might add} she still is just a baby and has her own little spin on the English language. I'm kicking myself for not writing down every single funny thing she's said and all of her Kenley versions of words, but there are a few that will forever stick and therefore have been deemed "Kenleyisms".
  • Chunky Mail -  or junk mail
  • Mewgert - or music
  • Woah-Woah - or car {no idea}
  • Bob - or sippy cup of  milk she gets when she wakes up and before bed
  • Poovie - or "smoothie" aka those fruit/veggie pouches
  • Bobo - her best friend Brody
  • Calvin and the Chickbux - Alvin and the Chipmunks
  • Nen - her nickname for herself
  • Paw-pellows - or marshmallows
  • Fa-go me - or fallow me
Currently she can't say her "Rs" or her "Ls" and both she pronounces as a "W" so her name is "Kenwee",  her favorite color her "Weh-whoah" {yellow}, 

And then she has all 8 of her grandparents which have their own unique Kenley name: Papa Tom, Papa Meow Meow, Papa Horsie, Papa Steve, Yia Yia, Grandma Juicey, DiDi and Blue. 

Each time she learns to say a word correctly, I get a little sad. I mean, I'm happy she's learning and am proud to have the most brilliant kid to ever live but her fun little language is so cute and I kind of want her to talk like this forever. 



Tuesday, September 29, 2015

Big Girl Room

Now that we are moved and settled and have those high priority projects complete, it's time to start working on some of the fun ones. First up: Kenley's Big Girl Room! She has decided that she would like a ballerina room to match her suitcase and I must say, I can't complain because she has the cutest suitcase of all time.

So the plan is to convert her toddler bed into a daybed, get her a new dresser, refinish all her furniture so it's white, paint the walls gray, accent away with all things pink and ballerina and then top it all off with some super cute new bedding! I picture it being very girly, very sweet, very fun and most of all very Kenley. 

Naturally, I've been pinning things away left and right and have quite a few ideas and inspiration photos saved away. Here's a little look at some of the inspiration for Kenley's Big Girl Room! 
Pinks: Petal pinks are bright pick-me-ups, but they can also be surprisingly sophisticated and livable. To suit grown-up tastes, skip the confectionary pinks like bubble gum and cotton candy. "Choose a pink that is found in nature, like the pink in a sunset," says Shazalynn Cavin-Winfrey, a designer in Washington, D.C.:      You Are My Sunshine Sign Distressed Sunshine Sign by WordWhipped, $60.00:
Ballerina Decorative Pillow
#shenasiconcept custom design nursery artwork. Ballerinas in pink. #ballet #painting:      Catalina Storage Tower | Pottery Barn Kids Ellie's Big Girl Room window??:
Pink Grey White Frame Set Custom Frames Open or by BeautiSHE:
Belgian Linen Toddler Bedding
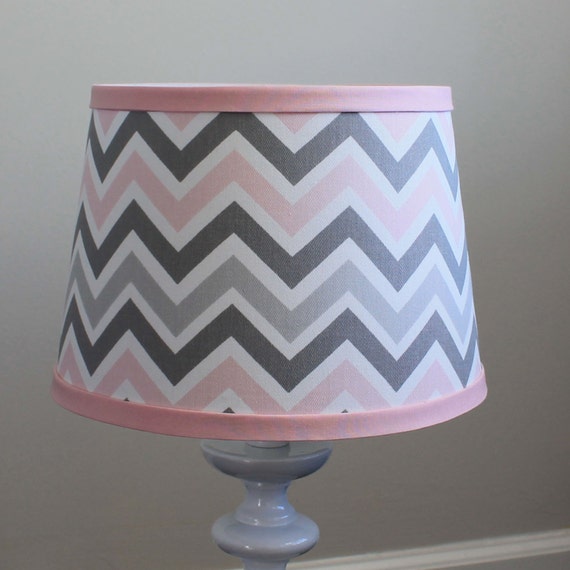
ceramic tones: Small Pink Gray Chevron lamp shade.
moederdag schilderij:    Play Room Idea: fake window and curtains for above play kitchen:
Hey, I found this really awesome Etsy listing at http://www.etsy.com/listing/114902674/pillows-baby-pillow-case-baby-girl-baby:
All of these and more can be found on my little {decor}. board on Pinterest. 

Thoughts? Ideas? Anyone want to come over and help?


Monday, September 28, 2015

a bridal brunch

This past weekend my best friend got married! While I do have a few photos from the weekend's festivities, I decided to wait to do a full recap until we have our professional photos back from Sara Jayne! I do, however, have photos from the Bridal Brunch my mom and I hosted to kick off the wedding weekend. I'd only been to one Bridal Brunch in the past, for my sister-in-law, and absolutely loved it. It's intended for just the bride, her bridesmaids, her mom and her mother-in-law-to-be. It's nothing more than a lovely reason to celebrate the bride and the women closest to her and start the wedding weekend off on a happy and excited foot. 

We decided to go with a girly pink, white and silver color scheme which really came together nicely. The menu we wanted to keep light, since everybody had to be in a bridesmaid dress the next day. So we did a build your own salad bar with a variety of fresh toppings, dressings and lemon oregano chicken along with fresh fruit. We also, of course, had a mimosa bar! And for dessert some lovely vanilla buttercream cupcakes made by yours truly. Two of our gorgeous ladies are gluten free, so it was my first experience baking with a gluten free flour blend, but I've got to say it may be my new go to! The cupcakes were delicious! 


Friday, September 25, 2015

Dear Bestie Face

Tomorrow my very best friend in all the land is getting married and I'm an emotional wreck. I haven't felt like this since my own wedding! I am just SO excited and want everything to go perfectly and can't wait to celebrate with family and friends. 
I know without a shadow of a doubt that Libby has found her match. Nathan is literally perfect for her and seeing my best friend this happy in love is amazing! 

Every since we met that fateful day on the 7th grade school bus Libby has been my soulmate. It's a friendship where we don't need to talk every day or even every week, we are always there for each other at any time no matter what. Libby has helped me through every break up, brought me peachi-o's and mini orange juices when I am sad, stood by me on my wedding day and even came to OB appointments with me when I was pregnant with Kenley. 
One of my favorite quotes is "A best friend is someone who comes in when the rest of the world has gone out" and that is my Libby. I suppose have to share her now but instead of feeling sad about it, I couldn't be more excited. This weekend is going to be epic and I just cannot wait! 
Happy Wedding Weekend my Bestie Face, I love you more than werthers and schnookems combined. 


Thursday, September 24, 2015

School!

Kenley has been in school for two weeks now and it could not be going any better! She is in a class of 15 2.5 - 3 year olds twice a week and loves it so much. She has two super sweet teachers, Miss Lynn & Miss Nicole and looks forward to going every day. 
She proudly marches in with her Peppa Pig backpack that never has anything in it. She hangs it in her little cubby and off she goes. She has no issues with us leaving her and is clearly comfortable and secure there. 
I am actually wishing we would have signed her up for three days a week. It's so good for her and she loves it so much. Plus, Jason and I love hearing her recaps of the day and all the stories about the other kids. I'm dying to pick her up this afternoon because today was "Yellow Day" and yellow is Kenley's favorite color so naturally she thinks everyone is wearing yellow solely because it's her favorite color. 
I don't know what it is about that school that makes her seem so grown up but it definitely hurts my heart a little. I couldn't be happier that she loves it so much and know it's so good for her, but I miss my squishy little baby. Why must they grow so dang fast?


Wednesday, September 23, 2015

So, I Have a Garden

While moving into the new house, we noticed two garden beds filled with vegetables. For those of you who know me in real life, you can stop laughing now. I have what I call a "black thumb" because I literally kill every plant or flower I touch. I know nothing about growing plants or maintaining a garden but I have to admit, it's kind of fun finding the veggies growing in there! And Kenley LOVES it! She has a little watering can and gets so excited to find new "gween beans". 
The other day I got a wild hair and started picking weeds from the garden {yes, I actually knew which ones were weeds} and pulling up anything that appeared to be dead. I've got to admit it was kind of fun! So now I'm over here googling garden information and trying to figure out what I want to grow next summer! I also think I need to find myself some fancy little gardening gloves because I am still picking dirt out my nails. 
I know, I know...who am I?
I try to eat primarily organic and it doesn't get much more organic than making snacks from food you found in your backyard! In the current garden we have carrots, onions, squash, green beans, corn {yes corn}, cucumbers, tomatoes and parsley. I think next summer it would be fun to do a fruit bed and a veggie bed - maybe do some raspberries and strawberries and definitely some peppers! I think I might try dill too, because I put dill on everything! 
Do any of you have fruit or veggie gardens? I'd love to know how much time you spend maintaining it and any tips you have for a newbie!  I guess by next summer you can just call me farmer Kristin! 


Tuesday, September 22, 2015

DIY Lion Cupcakes

Morning everyone! Before we get down to cupcake art tutorials, take a minute to visit Confessions of a Northern Belle! I am guest posting and desperately need some advice on my upcoming Maid of Honor Speech! 

Over the weekend I helped host a baby shower for my friend Abby and her little peanut due to arrive in November. Abby is an AVID Lion King fan so a Lion/Jungle baby shower was essentially a must. The decor turned out super cute and the food was amazing!
However, I've got to toot my horn a little and say the hit of the party were my Lion Cupcakes! This was a first for me and no I did not use a Pinterest tutorial {for the first time ever} so I was feeling pretty stinkin' good that they came out as good as they did. And shockingly, they were really easy! So, I'm going to share how to make them so you too can make adorable little lion cupcakes. 
WHAT YOU'LL NEED

For the Vanilla Cupcakes

  • 1 c Granulated Sugar
  • 1 3/4 c Flour
  • 1 1/2 tsp Baking Powder
  • 1/2 tsp Baking Soda
  • 1/2 tsp Salt
  • 1/2 c {or 1 stick} Unsalted Butter, at room temp
  • 2 eggs
  • 1/3 c Greek Yogurt or Sour Cream {full fat versions!}
  • 1 tbsp Vanilla Extract {spring for the good stuff - not the fake}
  • 2/3 c Whole Milk

For the Vanilla Buttercream Frosting

  • 1 c {or 2 sticks} Salted Butter, at room temp
  • 1 tsp Whole Milk
  • 2 tsp Vanilla Extract {again, the real stuff}
  • 3-4 c Powdered Sugar 

Additional
  • Yellow, Red & Blue Food Coloring
  • Brown Cupcake Liners {I used these from Wilton, found at Target}
  • Candy Eye Balls {available at Target, Michaels, JoAnn, etc}
  • Black Decorating Gel
  • Piping Bag & Tip {I used a #32 Tip}
DIRECTIONS
  • Start by preheating your oven to 350˚.
  • Add butter to a mixing bowl and beat until soft and smooth.
  • Add sugar, flour, baking powder, baking soda and salt to bowl and beat on medium speed until well combined and a tad crumbly. It helps to add flour just a bit at a time. 
  • Add eggs, Greek yogurt {or sour cream} and Vanilla then mix. 
  • Finally, add the milk and mix on low speed. Your batter should be pretty thin. 
  • Fill the cupcake liners about half full and bake for 12-15 minutes {testing after 12 minutes to see if they're done}. They should be lightly browned on top and a toothpick should come out without any wet batter stuck to it. 
  • Let your cupcakes cool, ideally overnight in the fridge.
  • Once the cupcakes have cooled, you can start your frosting!
  • Add 2 sticks of butter to mixer and beat until completely smooth. 
  • Add vanilla and milk and mix until combined. 
  • Slowly add powdered sugar, I will usually add one cup at a time and mix well. Continue to add powdered sugar until you reach your desired taste and consistency, usually between 3-4 cups for me. 
  • When you've got your frosting where you want it to be it's time to add food coloring for the lion's face. I added mostly yellow with a couple of drops of red. Just play around with it until you get the color that you want. 
  • Fill your piping bag with frosting making sure to push the frosting to the bottom of the bag and remove any air bubbles. I started on the outside of the cupcake and frosted in a swirl motion creating a nice flat base for the face. I made a few extra cupcakes so I had some practice ones - I definitely recommend doing this, specially if you aren't used to a piping bag!
  • Next I added another smaller swirl on the bottom of the cupcake. I tried to pick a spot on the cupcake that wasn't completely frosted to add the snout. The on the top of the cupcake did two quick little lines for the ears. 
  • Now it's time to add your eyes! I learned the hard way that not all pupils are created equal. Take the time to try and pick two eyes that have the same sized pupils, otherwise you end up with some pretty wacko looking lions. 
  • Although your cupcakes now look like pigs, do not be alarmed! The mane makes all the difference. At this point you should clean out your piping bag and tip. Let them air dry while you create your mane frosting. With the remaining buttercream frosting add a little more red food coloring and a drop or two of blue. This color took me a bit to get, so just experiment! Add to your piping bag and simply add little drops of frosting all around the perimeter of the cupcakes. 
  • Then, finally, you will use your black decorating gel to add a nose and mouth. I practiced a few times on some paper towel to be sure I got the look I wanted. I added a glob for the nose first, then went back and added the thin line down the middle, then added the little smile last. 
VOILA!